- Contact Us
- -
- Payment
- -
- 中文版
Knowledge Center · 2026-09-30 09:24:25 · 6 hits
1. Overview
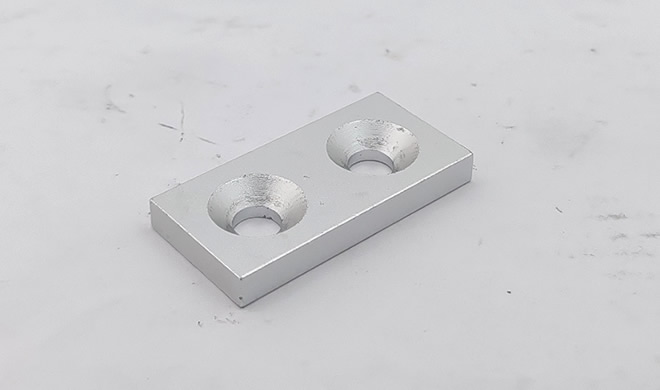
A countersunk magnet is a specially designed magnetic assembly with one or more countersunk holes machined into the magnet body, allowing it to be fastened with screws or bolts. The countersink lets the fastener head sit flush with — or below — the magnet surface, keeping the installed profile clean, flat, and free of protrusions that could snag or interfere with adjacent parts.
It is worth clarifying how these magnets actually work in service: the screw fixes the magnet to a base (which may be non-magnetic), while the magnet's magnetic force acts on a separate ferromagnetic target such as a steel plate, door, or component. The fastener provides the mechanical attachment; the magnet provides the holding or latching force against the target.
2. Key Features
Material and Performance
Magnetic material: Typically high-performance neodymium (NdFeB) or ferrite (ceramic), selected for strong magnetic output and stable performance.
Corrosion protection: Depending on the duty environment, the surface may receive zinc plating, nickel plating, or other anti-corrosion treatments to extend service life.
Design Flexibility
Customizable countersink: Hole position, diameter, and depth can be adapted to customer requirements, supporting a wide range of mounting layouts.
Multiple shapes: Beyond the common round disc, square and rectangular bodies are available to suit different application geometries.
Ease of Installation
Direct fixing: The magnet is secured straight to a surface with screws, simplifying the assembly process.
Fewer auxiliary parts: No separate brackets or holders are required, reducing both cost and assembly time.
3. Typical Applications
Industrial Automation
Fixture and end-effector quick-change: Used on robot-arm end effectors for fast tool swapping, improving production-line flexibility.
Material handling: Enables non-contact transfer and positioning, reducing mechanical wear and improving system reliability and service life.
Consumer and Commercial
Furniture: Serves as a concealed door latch or drawer catch, offering a neat and practical closing solution.
Display racks and cabinets: Holds displayed items securely via magnetic attraction without affecting the visual presentation.
Medical Devices
Surgical instrument organization: Helps clinicians locate and secure instruments quickly, improving workflow efficiency.
Wearable medical devices: Supports compact, body-conforming devices such as heart monitors.
4. Selection Considerations
Choose a countersunk magnet against the real duty, not just by catalogue pull force.
| Factor | What to check | Why it matters |
|---|---|---|
| Environment | Temperature, humidity, presence of salt/spray or chemicals | Drives magnet grade and coating choice |
| Mechanical load | Target weight and expected force | Sets required size and magnetic strength |
| Protection rating | IP / corrosion class needed | Prevents premature failure outdoors or in washdown |
| Cost vs lifecycle | Unit price vs expected service life and maintenance | Avoids false economy on high-cycle use |
| Compatibility | Fit with existing mounting and standards | Prevents install/operation issues; verify industry compliance for special uses |
NdFeB vs Ferrite — Which to Choose
| Property | Neodymium (NdFeB) | Ferrite (ceramic) |
|---|---|---|
| Magnetic strength | High — strongest pull per size | Moderate — larger size needed for same pull |
| Max operating temp | Grade-dependent, ~80–230 °C | Higher intrinsic tolerance, ~250 °C class |
| Cost | Higher | Lower |
| Best for | Compact, high-pull, indoor/protected duty | Cost-sensitive, high-temp, or mildly corrosive duty |
Application analysis: Understand the working temperature, humidity, and other environmental factors, then select the magnet material and protection level accordingly. Determine size and strength from the load and force requirements.
Cost–benefit evaluation: Compare prices across brands and specifications to find the best value, while factoring in service life and long-term maintenance cost.
Compatibility check: Confirm the magnet fits the existing system, and for special applications verify compliance with relevant industry standards or regulations.
5. Installation Method
Preparation
Clean the mounting surface: Remove oil, dust, and debris so the magnet seats properly and the screw holds securely.
Measure and mark: Accurately mark the countersink positions so drilling is precise and aligned.
Installation Steps
Drill: Use a drill bit of the correct diameter to create the hole at the marked location.
Fix the magnet: Place the magnet into position and secure it firmly with the screw through the countersunk hole.
Countersink and Screw Size Reference
Match the screw to the magnet's countersink so the head sits flush. Typical pairings (varies by manufacturer):
| Magnet diameter (mm) | Magnet thickness (mm) | Recommended screw |
|---|---|---|
| 10 | 3 | M3 |
| 16 | 4 | M4 |
| 20 | 5 | M4 |
| 25 | 7 | M5 |
| 32 | 8 | M6 |
| 36 | 8 | M6 |
| 42 | 10 | M8 |
*Always confirm the exact countersink diameter and depth on the product drawing before ordering screws.
Installation Checklist
Mounting surface cleaned and degreased.
Hole positions measured and marked to drawing.
Correct drill and screw size selected from the reference above.
Screw torqued to spec — not over-tightened.
Washer used where height adjustment or face protection is needed.
Target is ferromagnetic (steel); verify pull on the actual part.
Precautions
Do not over-tighten the screw — excessive torque can crack or deform the magnet.
In some cases, add a washer to protect the magnet surface or to fine-tune the installed height.
6. Common Installation Issues
| Symptom | Likely cause | Corrective action |
|---|---|---|
| Magnet cracks or chips | Over-tightened screw / hard impact | Torque to spec; use washer; handle gently |
| Weak or no hold | Target is non-ferromagnetic (e.g., aluminum, plastic) | Use a steel strike plate / ferromagnetic target |
| Rust on magnet face | Coating inadequate for environment | Upgrade to Ni/Zn or stainless-rated version |
| Screw strips or spins | Wrong drill size / soft base material | Match tap drill; use threaded insert or backing plate |
| Magnet sits proud of surface | Screw too short or countersink depth mismatch | Use correct screw length; verify countersink depth |
Copyright © 2016-2025 Forrun (Guangdong) Industrial Technology Co., Ltd All Rights Reserved.


